Category Archives: Christmas

Luxury Christmas Tree Card

Christmas Tree Peel Off Card with a Gold Ribbon Frame. This card is very similar to the ‘Christmas Tree Peel Off Card’ that I posted previously but by using a pearl gold card and with the addition of brads, ribbon and glitter you end up with a very effective and more luxurious looking card.

Peel Off Christmas Tree Card with Gold Ribbon Frame

What is required to make this card:

  1. A6 card blank
  2. A5 Metallic Paper Gold
  3. Some separate gold card
  4. Some separate plain cream or white card
  5. Woodware Mini Round Brads – Christmas Colours
  6. Gold 5mm Ribbon
  7. Christmas Trees Peel Off Sheet – Gold
  8. Happy Christmas Peel Off Sheet – Gold
  9. Glitzy Gold Metallic Marker
  10. Coloured felt tip pen
  11. Red glitter, gold glitter & silver glitter used with glitter bond or glitter glue
  12. Craft knife, pencil, ruler & cutting mat
  13. Decoupage/precision scissors
  14. Craft glue, 5mm sticky foam pads & 6mm double sided sticky tape

Directions:

Cover the card blank in the gold metallic paper, you can either cover the whole card blank front and back or to save paper you can cover just the front if you wish. Use double sided sticky tape as close as possible to the edges of the card blank to avoid the edges of the paper lifting.

Remove a Christmas tree picture sticker from the peel off backing sheet, let the sticker relax for a minute on the end of your craft knife, to allow it to regain shape if it has stretched at all and then stick it to the plain cream /white card. Using the decoupage scissors carefully cut the tree out taking particular care around the candles.

Use felt tips pens to colour in the peel off centre sections in appropriate colours. Colours used here are green tree, brown tree trunk, yellow star, blue tree decorations, pink/purple/red gift wrapped presents under the tree. Use the gold metallic marker to colour any areas you found hard to cut out but that need to merge in with the background of the card such as either side of the tree trunk.

Push a red mini round brad through each of the four baubles on the Christmas tree and bend the prongs back. Use glitter bond to apply some red glitter on top of the four red brad baubles, gold glitter to the star and a sprinkling of silver glitter on the presents. You could use glitter glue instead of the glitter bond and dry glitter here if you wanted to. Put the completed tree to one side to dry.

Take the separate gold card, measure and cut out two narrow strips the same length as the height of the card blank and two narrow strips the same length as the width of the card blank, all four strips should be about 6mm wide. Apply a strip of double sided sticky tape to the gold side of all four card strips overlapping each end of each strip so the tape folds over the back a short way. Cut 2 lengths of the gold 5mm ribbon 2cm longer than the short card strips and 2 lengths of gold ribbon 2cm longer than the longer card strips. Peel off the sticky tape backing on the card strips and carefully stick a length of ribbon to each one overlapping the ribbon over both ends of each strip. The reason we use gold card here is that another colour may show through the ribbon.

Using a craft knife make a small hole 1.25cm into each end of all four strips of ribbon covered card. Make the four strips into a frame by pushing red and green mini round brads through the holes you just made and bending the prongs back to secure all four strips of card together as shown in the picture.

Attach 5mm sticky foam pads to the back of the frame at regular intervals and then use these to attach the frame to the card blank taking care to line it up evenly on all four edges.

Next using more sticky foam pads attach the peel off tree to the card inside the top centre of the frame.

Finally to finish the card off, remove a ‘Happy Christmas’ wording from the peel off sheet (again allow the sticker to relax on the end of your craft knife blade before applying it). Place the wording in the space underneath the Christmas tree and use a ruler to make sure it is straight. Once you are happy with the position of the wording press down on it firmly to stick it in place.

Card Idea by Janine
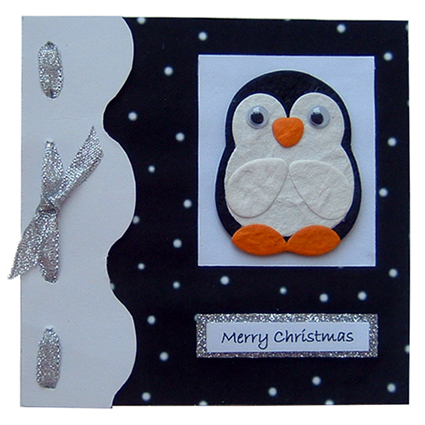
Cute Penguin Card

If like me you know someone who is nutty about penguins then this cute penguin card is for them! Otherwise it is also a fun childrens Christmas card.

Cute Penguin Card

Items you will need:

  1. Small square (125mm x 125mm) white card blank
  2. Some plain white card and plain white paper
  3. Silver glitter card
  4. Snow background paper free download
  5. Printer & white printable paper for printing the snow paper and the sentiment
  6. Cute Penguin Die-Cut
  7. Silver Ribbon
  8. Sticky foam tape/pads and 6mm double sided sticky tape
  9. Craft knife, pencil, eraser, ruler & cutting mat
  10. Decoupage/precision scissors
  11. Paper Trimmer (optional)

How to make:

Download and print out the snow background printer. You will need Adobe Reader to open the template file, if you do not have Adobe Reader you can download it free from this link to the official Adobe website: Adobe Reader Download.

Allow the print ink to dry thoroughly and then cut the paper to the exact size of your card blank using a craft knife, cutting mat & ruler or a paper trimmer. Use double sided tape on all four edges of the snow background paper and then carefully stick it to cover the front of the card blank.

From the plain white card measure and cut out a strip of card 3.5cm wide x 12cm tall. On the right hand side of this strip of card use scissors to cut a wavy edge design.

On the same strip of card using a ruler and pencil make a mark at the following intervals (each one measured from the last) 5mm from the top, 2cm, 1.5cm, 4cm, 1.5cm and 2cm, the last mark should be roughly 5mm from the bottom of the card strip. All of the marks should be in a straight line about 1-1.5cm from the left hand edge. Using a craft knife make small holes at each mark twisting the knife to open the holes up slightly.

Cut a 17cm length of the silver ribbon. Thread the ribbon in and out of the holes on the card strip starting from the back of the top hole. You should end up with the ends of the ribbon poking through the back of the top and bottom holes. Pull the ribbon through so the ends are roughly even in length, trim the ends and secure each one down with a strip of sticky foam tape making sure the tape does not stick out over the edges of the card strip. Apply another strip of foam tape to the centre of the card strip and then use the three foam tape sections to stick the card strip to the card blank so the straight edge is lined up with the very left hand edge of the card.

To finish the decorative ribbon strip, cut a 7cm length of the silver ribbon and tie this around the centre of the threaded ribbon, once you have tied it, trim the ends to around 2cm in length.

Next take some plain white paper, measure and draw a 5.5cm x 6.5cm rectangle that you then cut out either with a paper trimmer or craft knife, cutting mat and ruler. Erase any remaining pencil marks after cutting the rectangle out.

Using double sided sticky tape around all four edges of the white paper rectangle, stick it to the card blank positioned roughly as shown in the picture. Then use sticky foam pads to stick the cute penguin die-cut to the centre of the white paper rectangle.

From the silver glitter card measure and cut out a rectangle that measures 5.5cm x 1.25cm. To create the sentiment use your printer to print out the words ‘Merry Christmas’ in black writing on white paper. The font we have used here is called Bradley Hand ITC and the font size used is 16. Use a paper trimmer or craft knife, cutting mat and ruler to cut round the wording so that it measures 5cm wide x 0.75-1cm high making sure the wording is central in the finished rectangle. Using a strip of double sided sticky tape stick the wording to the centre of the silver glitter card rectangle and then stick the finished sentiment to the card blank about 1.5cm up from the bottom edge and so it is aligned with the white penguin topped rectangle above.

Card Idea by Janine